Wayland

Showing posts with label base building. Show all posts

Thursday, October 18, 2012

Wargames Terrain: Oil Barrels

In ascending order of awesomeness, here are some awesome things to look at:

  • A gaming table full of models fighting each other
  • A gaming table full of painted models fighting each other
  • A gaming table full of painted models fighting each other in and around painted scenery and objectives.

This week I decided to challenge myself a little bit and paint something I don't normally do: scenery. GW added exploding fuel dumps as an optional extra to the latest version of 40k. I have had a small piece of barrel-filled scenery sitting on the shelf for months now, plus I came home with another set from Games Day (free! From GW!), so I decided to paint those suckers up and make some. obstacles/objectives for wargames.


First up, the set of barrels and jerry cans from the GW batttlefield scenery kit. You only get three barrels and two cans in the set, which is barely enough to make one fuel dump. Its representative of a fuel dump, is probably as generously as its possible to describe the piece. But with 6th ed. rules you can hide behind them, I guess, and thus make them explode. So hey ho.


On the other hand, these are the barrels GW gave me fore free(!) at Games Day this year. Now thats more like it. A proper collection of potentially explosive containers. They also gave me some tinfoil (!) and half-heartedly told me I could paint it as camo netting. I binned that though as I had a better idea - see below.

First the paints used and techniques. This all comes from Forge World's Model Masterclass Volume 1 - a great primer on advanced modeling and painting.

I sprayed the cans with Desert Yellow first. GW don't make this paint any more, of course, because it was great, so you'll need to find your own alternative. It doesn't really matter too much what you choose as the base as you'll be weathering the *&%$ out of it later on. But I recommend a khaki or olive colour for verisimilitude.

I then sponged on Charadon Granite to get the chipping, concentrating on raised edges and the top and bottoms of the barrels as this is where the worst wear would occur. And that is a hard sentence to say or type.If you can't get Charadon Granite, look for a dark grey, almost black to sponge on instead.

 To pick out the details I used a mix of black and brown oil paints, thinned with thinners, gently pushed into the corners and crevices. The nature of the thinners causes the mix to flow along these lines, so mixing it up in the first place is probably the hardest part of this job.

I then made up some rust with the brown oil paint. some thinners, and some rust weathering powder. I flicked this onto the drums just by stroking my finger along the bristles of an old brush that was loaded with the rust mix. You get a nice splattering pattern this way, which you can then soften up by spraying on more thinners.

I used thinned brown ink as 'oil' and dribbled it around the seams of the barrels and on the flooring around them. This is definitely a no-smoking area. Lots of oil and dirt lying around. These cans are meant to be used and reused.

To make the larger stack of barrels a proper source of cover and concealment, I wanted to add some camo netting that would look a bit more convincing than painted tinfoil. I'm not saying you can't paint tinfoil to look awesome. Just that I can't. So, using another technique from Model Masterclass, I raided my First Aid box for a bit of bandage. I soaked this in watered down PVA glue, wrung it out, then draped it over the barrels.

The next morning the bandage had dried almost completely stiff. I first glued on several strips of thin masking tape. then painted it all with watered-down Graveyard Earth and lots of it. The bandage naturally soaks up the paint, I may have wrung too much of the glue out, and requires lots of coverage. I finished it off with a drybrush of Kommando Khaki, and hey presto, a camoflaged fueld dump.


 I'm very pleased with how the barrels came out, perhaps less so with the camo netting. I wonder if there is some way to paint the fabric before gluing it and setting it in place.

For now, I have two nicely painted bits of scenery to go on the table :) Next up - the ammo canisters.


Monday, August 6, 2012

Final Gallery - Sun Blitz Brotherhood Eldar Corsairs

Alright, these boys are about as done as I want them to be. I could add a few more little details here and there - glyphs on the helmets, that sort of thing - but I really don't want to paint them any more. Time to move on to something else. So here they are:


 Its a ten man squad, complete with a missile launcher and a shuriken cannon. I envisage them holding an objective in my deployment zone and taking shots at anything that comes too close.


The heavy weapons are both scratch-built from several spare parts from tank kits. This guy did have a really cool looking forehand grip - that got lost somewhere during transportation ><

 I started building the missile launcher before I realised the hand holding the handle was the left one. That meant I had to find a right hand that didn't have a weapon, leaving this Corsair looking as if he is suggesting a new direction the squad should attack.


The squad leader is carrying a shuriken pistol and power sword. Just a little bite in case of being assaulted. Not that Str 3 is likely to worry too many enemies...

The bases were all painted with GW's Stirland Mud textured paint with a few pieces of slate and small pebbles mixed in for variety. These additional parts were painted Bestial Brown before I dry-brushed the whole thing with Kommando Khaki and Bleached Bone. The addition of a few tufts of reedy grass and some orange rubber foliage helps break up the bases and tie them in to my flyer bases.

Right, I'm off on holiday now - see you in a week or so.

Monday, July 9, 2012

Nightwing Scenic Base 2: Forest Pond

Just time for a quick shot of my scenic base for the Eldar Nightwing fighter.

Although my inspiration pic features green water, I figured I would make mine blue. This is to tie it in with the blue gems on the fighter. Just like the picture though, I am going to try to use lots of oranges and reds on the rest of the scenery, again to tie in with the paint scheme on the fighter. There, I must be getting better as a painter. I'm talking about 'tying in colours' and stuff.

Just pretend that glue isn't there...

So, I painted the slates with Bestial Brown, and dry-brushed them, quite heavily, with Kommando Khaki and Bleached Bone. They look earthy, with enough of the brown showing through to get that red hit.

I have then glued on some of that rubbery foliage you can get from any model shop. Its a little stinky and, if you use too much, doesn't look great at this scale. But if you just use a little, and put some thought into where it goes (i.e. coming out of the crevasses between rocks, not just slapped down randomly on top) it looks reasonably like natural foliage.

I also used some Woodland Scenics artificial grass to make reed-like clumps of greenery around the edges of the pool. Not too much - Just enough to show there is life around the edges of the water. I also kept it away from the 'beach' - if this is a living world we're looking at, its likely animals would be coming down to the waters edge to drink. This also helps the base feel more like a portrait - the open edge draws the eye into the water, while the rocks at the far end frame it all.
I ddid add a couple of fallen logs at the near end and some rocks though. I see them as an opportunity to add more red and orange accents, probably in the form of lichen or leaves, to again help tie the base in to the model flying above.

The water itself is really simple. Its just three layers of blue, starting with a dark layer under the rocks and finishing up lighter where the water ends. I will be adding Water Effects later, but this simple paint job will help give an impression of depth and reality to the whole thing.

Overall I'm very pleased with how this thing is turning out. Just have to wait a few hours for all that PVA to dry now...

Saturday, July 7, 2012

Nightwing Scenic Base - Forest Pond

Having spent a fair amount of time and effort on my Nightwing, I decided I had better make a decent fist of its base. As mentioned in recent posts on my Cryx army, I have been playing with water effects recently. A pond in a clearing of some sort seemed the perfect way to resolve the problem of building an attractive, interesting base - that has a massive transparent pylon sticking up out of it.

That said, here's, my guide to building a forest pond themed flying base.

To start with, you will need some inspiration. Unless you're one of those incredible artistic, creative types who can just like, you know, 'imagine' stuff and then create it, its a good idea to do a bit of photo research.

A lot of us like to just wing it. Whether its because we think that is how genuine creative geniuses work (its not) and that we too are so gifted (we're probably not), or we just don't think we have the capacity to or patience to plan out something great, there's really no excuse, what with Google image search being so easy and available, to not at least type in 'forest pond'. Doing so will give you images like this:


Alright - there we go. The idea of layered rocks forming a sort of bracket for the water on at least one side is one I probably would not have had otherwise. The sloping effect is also something cool I can try.

Using some GW textured paint and some pieces of slate I found on the road, we can get something like this:


I'm trying to build up a sort of beachy slope in the foreground. I have also made sure to seal all the gaps between the rocks at their bases so as not to let any of the water effects through when I add them later on.

The textured paint is pretty versatile stuff. As well as giving you a pre-textured and pre-basecoated base, it will dry to form a fairly strong grip on the slates I pushed into it when wet. It is not super-easy to sculpt or shape, but with a little perseverance you can get some good slopes, pits, ridges, and so on.

It takes maybe an hour to dry though, so I will leave it for a while before adding some more layers and rocks.

Tuesday, June 5, 2012

Urban Base Part 4: Nearly Done

So, having, washed and drybrushed everything, then painted up the gold bits, it was time to add some weathering powders.

Now, you can get a lot of the effects I have gone for using normal brushes and paints. But I really like using powders as they seems to give a richness to the effect very quickly. Because these things don't dry as such, it is easy to blend tones together, get streaks, and piles of the stuff in cracks and crevices.

As someone who has actually started a fair few fires, I can certify it looks fairly authentic
 
 I do have a couple of tips for anyone else planning to use powders though, mostly related to the fact these are very light, very strongly pigmented powders that will stain anything on contact and are designed to spread.

So, firstly, take care opening them. I use the Forge World powders and the lids can take a little 'persuading' to get off. So it can be tempting to just jam your thumb in there - DON'T. You run the risk of spilling them all over your self/home/pets if you take the cap off carelessly. On a similar note, make sure you are apply them to your model or whatever while it is on something disposable, like the large piece of cardboard in my pictures, not your regular painting area. Again, these are very easily spread, highly pigmented products and will stain anything they touch - take care clearing up any spills (I tend to mop up any dropped particles very quickly with a damp piece of kitchen roll). Finally, use a spray varnish to fix the powders to your model when you have the look you want. I use Army Painter's Matt Varnish for most things. Forge World sometimes use Citadel's Purity Seal (usually when they want to fix a detail in place but then paint over it with something else) and I'm sure there are many many others out there. I have even used an enamel matte varnish in an airbrush but I stick with the spraycan for convenience nowadays.

I also recommend getting a special brush for using powders. Not special like, it costs lots of money and you keep it in  velvet box. Just special, like you only use it for weathering powders. I got a nice stiff-bristled, fairly wide, artificial fibres one from the bargain bucket at my local art store and have been using it for a couple of years now. The stiff fibres help my pick up powder from its bottles and are  great for crushing it down or dragging it out on models. I don't even bother washing it really - pretty much all the powders come off the artificial bristles so I treat it something like a good wok - let a nice patina slowly build up that will add a characteristic 'flavour' to your work.

So, just by sprinkling, squashing, and dragging two powders - Grey Ash and Black Soot - I have a base that really is starting to look like its been in a fire. All part of the urban ruin look I am going for.

I started painting the rim of the piece with Graveyard Earth too. When I did, I started to find the places where my earlier layers of PVA sealant had gotten broken and cracked - there are quite a few pits and divots in what was a nice smooth surface before I started spraying. I guess the lesson I learn here is to take extra care handling stuff like this and USE MORE PVA!

Monday, June 4, 2012

Building an Urban Display Base Part 3

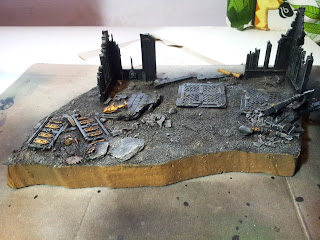
Pretty much all the easy stuff is now done. I have built the base, basecoated it, washed some parts, and drybrushed everything.

I am going for a dirty grey colour, a scheme that was once labeled 'urban' or 'hive world' or something like that by GW - until they decided to remove all pages that mentioned their 'old' colour range. First I went with a very dark grey - a mix of Chaos Black and a little Codex Grey. I then washed the ground with black wash. Everything has then been drybrushed with Codex Grey, then Fortress Grey, then, for the stone parts only, an extreme highlight of Skull White. Its a challenge to make the different textures stand out from each other while using the same colours. But that's one of the nice things about drybrushing - by varying the intensity or even just the direction with which you do it, you can create different effects that look quite convincing, quite quickly.


At the moment then, the base looks nice, but monochromatic. The next step is to bring out some of the details, particularly the gold on the collapsed balustrades and fallen Imperial icon, and get a bit of colour in there.

Its also important to remember that a lot of the base will end up covered by the figures I am going to display on it though, but hopefully there will still be enough of it visible to add character and a sense of belonging to my miniatures.

Wednesday, May 30, 2012

Building an Urban Display Base

There was a time when I thought I wanted a Grey Knights army. I kind of liked the idea of an Inquisitor-led group, rolling up heretics and xenos, then going home to toast the Emperor. Or whatever an Inquisitor army would do after a good fight. I went as far as getting a Gideon Lorr model from ebay (a £10 bargain!) and a couple of assassins, but never got round to painting them. The only models for the army I have gotten round to painting are these Terminators.

(Picture forthcoming)

Most of the time they just sit on a shelf, all lonely because noone wants to play with them. And most of the time I can't be bothered with entering my local GW's painting competition. But this month the theme is 'an infantry unit' and there may be some other good competitors so, time for these boys to see fresh air!

I am fairly happy with the paint on these models overall, but I particularly like the urban-style bases I did. I'm really proud of the salt-technique painting I did on the sergeant's base to give the impression of a shattered piece of roadway. Frankly, bases are normally my weakest area when it comes to models. Maybe I get bored easily, maybe I lack imagination, maybe I just don't see that many inspiring bases at all (not that they're not out there, just that they're not around here). But usually my basing doesn't go very far beyond sticking a bit of flock or some slate down.

I made an effort with these guys though and I figure I really don't want to lost the competition because even though my soldiers are the best painted, they lose because some other yahoo comes along with his massively over-worked base and wins because everyone goes 'oh, that's so cool', and votes for it even though most of the entry isn't even a GW product....

Didn't there used to be a rule about percentages of a submission being GW stuff?
 Well, not this time, buddy!

So, here's the start of my new project: Urban Display Base.

I'm starting out with a small piece of polystyrene foam, an offcut from another project. I have coated it with a layer of water-thinned PVA glue. This should help seal the base and make spray-paint-related melting incidents less likely further down the line. I've also started building a small collection of urban-themed scenery pieces to add on and will start sticking them on tomorrow.


Stay tuned for more urban goodness!