Wayland

Showing posts with label weathering powders. Show all posts

Thursday, October 18, 2012

Wargames Terrain: Oil Barrels

In ascending order of awesomeness, here are some awesome things to look at:

  • A gaming table full of models fighting each other
  • A gaming table full of painted models fighting each other
  • A gaming table full of painted models fighting each other in and around painted scenery and objectives.

This week I decided to challenge myself a little bit and paint something I don't normally do: scenery. GW added exploding fuel dumps as an optional extra to the latest version of 40k. I have had a small piece of barrel-filled scenery sitting on the shelf for months now, plus I came home with another set from Games Day (free! From GW!), so I decided to paint those suckers up and make some. obstacles/objectives for wargames.


First up, the set of barrels and jerry cans from the GW batttlefield scenery kit. You only get three barrels and two cans in the set, which is barely enough to make one fuel dump. Its representative of a fuel dump, is probably as generously as its possible to describe the piece. But with 6th ed. rules you can hide behind them, I guess, and thus make them explode. So hey ho.


On the other hand, these are the barrels GW gave me fore free(!) at Games Day this year. Now thats more like it. A proper collection of potentially explosive containers. They also gave me some tinfoil (!) and half-heartedly told me I could paint it as camo netting. I binned that though as I had a better idea - see below.

First the paints used and techniques. This all comes from Forge World's Model Masterclass Volume 1 - a great primer on advanced modeling and painting.

I sprayed the cans with Desert Yellow first. GW don't make this paint any more, of course, because it was great, so you'll need to find your own alternative. It doesn't really matter too much what you choose as the base as you'll be weathering the *&%$ out of it later on. But I recommend a khaki or olive colour for verisimilitude.

I then sponged on Charadon Granite to get the chipping, concentrating on raised edges and the top and bottoms of the barrels as this is where the worst wear would occur. And that is a hard sentence to say or type.If you can't get Charadon Granite, look for a dark grey, almost black to sponge on instead.

 To pick out the details I used a mix of black and brown oil paints, thinned with thinners, gently pushed into the corners and crevices. The nature of the thinners causes the mix to flow along these lines, so mixing it up in the first place is probably the hardest part of this job.

I then made up some rust with the brown oil paint. some thinners, and some rust weathering powder. I flicked this onto the drums just by stroking my finger along the bristles of an old brush that was loaded with the rust mix. You get a nice splattering pattern this way, which you can then soften up by spraying on more thinners.

I used thinned brown ink as 'oil' and dribbled it around the seams of the barrels and on the flooring around them. This is definitely a no-smoking area. Lots of oil and dirt lying around. These cans are meant to be used and reused.

To make the larger stack of barrels a proper source of cover and concealment, I wanted to add some camo netting that would look a bit more convincing than painted tinfoil. I'm not saying you can't paint tinfoil to look awesome. Just that I can't. So, using another technique from Model Masterclass, I raided my First Aid box for a bit of bandage. I soaked this in watered down PVA glue, wrung it out, then draped it over the barrels.

The next morning the bandage had dried almost completely stiff. I first glued on several strips of thin masking tape. then painted it all with watered-down Graveyard Earth and lots of it. The bandage naturally soaks up the paint, I may have wrung too much of the glue out, and requires lots of coverage. I finished it off with a drybrush of Kommando Khaki, and hey presto, a camoflaged fueld dump.


 I'm very pleased with how the barrels came out, perhaps less so with the camo netting. I wonder if there is some way to paint the fabric before gluing it and setting it in place.

For now, I have two nicely painted bits of scenery to go on the table :) Next up - the ammo canisters.



Tuesday, June 5, 2012

Urban Base Part 4: Nearly Done

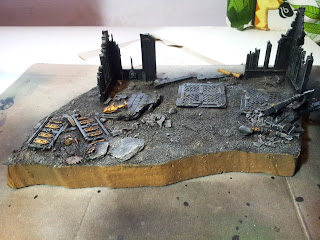
So, having, washed and drybrushed everything, then painted up the gold bits, it was time to add some weathering powders.

Now, you can get a lot of the effects I have gone for using normal brushes and paints. But I really like using powders as they seems to give a richness to the effect very quickly. Because these things don't dry as such, it is easy to blend tones together, get streaks, and piles of the stuff in cracks and crevices.

As someone who has actually started a fair few fires, I can certify it looks fairly authentic
 
 I do have a couple of tips for anyone else planning to use powders though, mostly related to the fact these are very light, very strongly pigmented powders that will stain anything on contact and are designed to spread.

So, firstly, take care opening them. I use the Forge World powders and the lids can take a little 'persuading' to get off. So it can be tempting to just jam your thumb in there - DON'T. You run the risk of spilling them all over your self/home/pets if you take the cap off carelessly. On a similar note, make sure you are apply them to your model or whatever while it is on something disposable, like the large piece of cardboard in my pictures, not your regular painting area. Again, these are very easily spread, highly pigmented products and will stain anything they touch - take care clearing up any spills (I tend to mop up any dropped particles very quickly with a damp piece of kitchen roll). Finally, use a spray varnish to fix the powders to your model when you have the look you want. I use Army Painter's Matt Varnish for most things. Forge World sometimes use Citadel's Purity Seal (usually when they want to fix a detail in place but then paint over it with something else) and I'm sure there are many many others out there. I have even used an enamel matte varnish in an airbrush but I stick with the spraycan for convenience nowadays.

I also recommend getting a special brush for using powders. Not special like, it costs lots of money and you keep it in  velvet box. Just special, like you only use it for weathering powders. I got a nice stiff-bristled, fairly wide, artificial fibres one from the bargain bucket at my local art store and have been using it for a couple of years now. The stiff fibres help my pick up powder from its bottles and are  great for crushing it down or dragging it out on models. I don't even bother washing it really - pretty much all the powders come off the artificial bristles so I treat it something like a good wok - let a nice patina slowly build up that will add a characteristic 'flavour' to your work.

So, just by sprinkling, squashing, and dragging two powders - Grey Ash and Black Soot - I have a base that really is starting to look like its been in a fire. All part of the urban ruin look I am going for.

I started painting the rim of the piece with Graveyard Earth too. When I did, I started to find the places where my earlier layers of PVA sealant had gotten broken and cracked - there are quite a few pits and divots in what was a nice smooth surface before I started spraying. I guess the lesson I learn here is to take extra care handling stuff like this and USE MORE PVA!