Wayland

Showing posts with label urban. Show all posts

Sunday, December 8, 2013

Deadzone Terrain - Speed Painting Guide


I went in fairly heavily for the Deadzone terrain. I pledged for enough mats for a complete 6x4 table, so I wanted enough building tiles, at least when combined with my existing stock of GW stuff, to cover them. Of course, now I have to paint them all...

I want to paint them quickly so I don't just end up with a bunch of unpainted sprues and parts. But I also want them to look good. Partly out of personal pride in my work, of course, but also because I want people to see that this is quality terrain - that Mantic have made a good product. So here's my guide to getting my tiles looking good quickly, as well as some optional 'effects' stuff you can do on top of the paint job to really get it looking cool.

To start with, I sorted my tiles into two piles: one for wall pieces, barricades, and vertical connectors, the other for floor tiles. I am not going to be painting the right angle connectors here. That's partly because most of them will be invisible once the tiles are clipped together, and partly because the ones you can see won't be coloured that differently to the tiles anyway. This is a speed run. But if you want to spend hours painting all the clips, go for it ;)

Next, I blu-tacked the tiles onto sheets of cardboard. Note I only have a dozen or so tiles on each sheet. This is because this was the test run to check the colours ad techniques all worked and looked good. But you save more time the more tiles you stick up each time, so I'll be doing twice as many tiles at a time in future.

Deadzone terrain tiles weathering painting guide

Its important to keep the vertical sections all aligned the same way. So the top of every wall is at the top of the card sheet, the bottom of every wall is at the sheet's bottom. It doesn't matter which way you line up the floor tiles.

Once the sheet is full, I took them out to the garden and primed them black. Most of the time I tell people it really doesn't matter what colour primer you use. But here, its important to use black. Any black - GW, Army Painter (which I use), or Halfords. But Black.

Deadzone terrain tiles weathering painting guide
Check those corners
 As you do this side of the tiles, its important to make sure both sides of the bevelled edges and all the insides of windows and viewports are well covered. Thats because later, when you come to paint the other side, you don't want to be blowing paint back onto this finished side. So be thorough. Get the edges and sides.

When the primer is dry, I sprayed the tiles with Humbrol Acrylic Sea Grey. This is a dark grey, almost black.

Deadzone terrain tiles weathering painting guide
A slightly uneven paint job will give your tiles 'character'

A smooth finish is not vital here - you can afford to be a little patchy. This may be counter-intuitive. You're always told that you need to get smooth layers of paint on models. But this is large scale terrain and a little variation in tone and texture is normal and natural and will make your tiles look better and more realistic when you're all done. I'm not saying leave parts of the tiles blank or to skimp on the paint. Just that you don't need to plaster the plastic trying to make every square millimeter of the thing a flat matte uniform shade.

I also spray the paint down onto the tiles. I don't mean just holding the can above the tiles, but firing it from the direction that is at the 'top' of each tile. This is most easily done by holding the sheet of card with my hand at the top of the sheet, and then spraying away. What this does is put a bit less paint on the bottom of any raised surfaces on the tiles. Doing it this way you get a 'drop-shadow' effect. It means you have shaded the tile without even trying and this is why you needed to make sure all the tiles were lined up the same way and primed with black paint. Again, this effect will be helped by not blasting every tile with paint until it squeals for air.

Note: this effect is probably easier to achieve with an airbrush than a spray can. But speed is more important right now.

So now we have a sheet or sheets of tiles, all primed, and all base-coated. Now its time to apply the main colour.

At this point I switch to the airbrush.

I would guess that at least one person reading this now is thinking 'airbrushes are expensive' or 'airbrushes are for expert painters' or something like that. Let me assure you, neither of those statements are correct.

My airbrush is really basic. It was a cheapo ebay purchase - £75, I think, for two (!) brushes and a compressor. For that I got a half-decent compressor and two basic airbrushes. It literally pumps air through the brushes and forces paint to go along too and thats it. No fancy gizmos, no variable apertures or trigger resistances.  It is one step up from what I would recommend anyone unable to get what I did - a GW spraygun. I think these are around £15 now and you'll need a can of compressed air too. Either of these systems will do for this, giving you the ability to spray much finer layers than a can and much smoother, more even layers than a brush.

Now its time to talk about the coolest part of the process - salt masking. Salt masking is using chunks of salt to mask areas of your model so they don't get any paint on them in the next layer. Its a fantastic technique to simulate wear and tear on painted surfaces. There are other ways to do it but salt-masking is the coolest. It looks like cookery but feels like magic when you do it right.

You will need:

  • salt, proper rocky or crystallised salt, the sort that goes in a grinder, not table salt. I use Waitrose Coarse Sea Salt Crystals.
  • hairspray. Get the cheapest stuff you can find. I use Tesco Value. 
You then take one of your sheets of tiles and spray the bejeezus out of it with the hairspray. I highly recommend doing this in a well ventilated room and possibly with a filter mask on. You want the hairspray to be a liquid layer on your tiles. While it is still wet, sprinkle on the salt. All over is good, particularly on the edges of raised areas, corners, and the edges of the tiles. Anywhere that looks like it might get knocked about as that tile holds up a building or gets walked over. Then you let it dry.

Deadzone terrain tiles weathering painting guide
Ready salted.

When it is, load up your airbrush or spray gun with the main colour for the tile. I used Vallejo Model Air Pale Grey Blue as it seemed like a nice match to the Deadzone mats.

In theory Model Air paints don't need any diluting. In practice I found the Grey to be a little thick, so I did cut it with a tiny bit of Tamiya Thinners. You want a fairly even coat here, but as with the previous step, a little patchiness is quite acceptable. Take note, some of the salt will probably fall off here, so make sure you're painting on a surface you can collect it from easily afterwards. As with the base coat, spray the wall tiles from their top side to accentuate that drop shadow effect.

Once this layer has dried, you will need a pot of warm or hot water and some cotton wool. Dip the wool in the water and use it to wipe off the salt crystals from the tiles. Now check out that magic! Say to yourself, 'Boy, can I paint!'. It doesn't matter if you scratch the paint as you go, or find slightly thicker areas where the light grey paint peels or rubs off. The more damage you do to it the better really.

Deadzone terrain tiles weathering painting guide
Boy, can I take photo's.
 So, you should now have a set of tiles that look like they've been through some wars. At this point you could just stick that stuff out on the table and enjoy playing with it.

But all that grey can be a bit overpowering though and make a table look a bit washed out. Don't get me wrong - a collection of salt masked tiles put together will make some impressive looking scenery people will love playing on. But for a little extra 'pop' I added some accent colour and used the salt mask technique again.

For my first batch of tiles I chose Vallejo's Game Colour Gold Yellow. At first glance this seems like a really strong colour. But you have to bear in mind the cold/hot colour model. That is, if you use lots of 'cold' colours - greys, some blues, some greens, - you can accent it with a contrasting 'hot' colour. In this case I have cold greys everywhere, so I am contrasting it with the warm yellow. Reds would also work, and probably some browns and purples as these also have red pigments in them.

I used Tamiya's masking tape to protect most of the tiles, then salt-masked the tiles as above before airbrushing on the yellow. Here's how they look when I wash off the salt.


Deadzone terrain tiles weathering painting guide


You don't need to do this accent step to every single tile. I did it to every one of the first batch just so I wouldn't need to do it again. If you did do it to every tile, well, you'd lose a bit of that individuality and leave your table looking all uniform again. I'll probably do a few more of the barricade tiles, just because it seems to make narrative sense these things would be painted to stand out a bit. But not every single wall and every single door needs to be marked out the same.

Note I only did this on the vertical tiles too. For the floors I did a quick wash with GW's Steel Legion Drab and dabbed it all over the tiles. Steel Legion is great for a generic 'dusty' look and here's how the dried tiles look.

Deadzone terrain tiles weathering painting guide


Its probably a good idea to give the tiles a coat of varnish at this point and I used Army Painter's Matt Varnish. These things are going to get a lot of wear and tear as they get put together, played on, and taken apart again.

The next step should be obvious: take the tiles off the board, turn them round, and do it all again to the other side. I might not even bother doing the floor tiles again though. One side is all you're ever likely to really see and that's done.

Take care when spraying paint on this second side though. Don't forget you have already painted the first side and you don't want paint creeping under the tile and ruining your paint job. A little stray paint won't hurt, just don't spray the tiles from extreme angles.

The most time consuming part of this whole process then is tacking the tiles onto the cardboard. Spraying the first two coats takes maybe five minutes. Spraying on hairspray and sprinkling on salt takes a bit longer, particularly as you have to wait for the hairspray to dry. Masking up areas for the accent colours is a little time consuming. But if you do a big enough sheet of tiles you only need to do it once. Get big tape. All in all, it is quite possible to paint scores of tiles, on at least one side, in an afternoon.

edit:for those put off by airbrushing or salt masking go here for a guide to similar technique that uses neither.

Hopefully then, this guide has been useful to someone and I'm always open to questions or ideas for other ways to do things so feel free to leave a comment and, if you liked the guide, please click on the ad at the top right :) And check out my guide to weathering your tiles here.




Sunday, June 10, 2012

Finished Urban Base

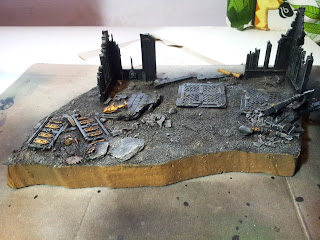
I put the final later of paint on the room if my urban base this morning, then dropped it off in the shop. Yes, is still two weeks until the actual competition, but I figured I've rather have it our of the house and therefore at little risk of me accidentally breaking it in the next fortnight.

I forgot to take a picture before I packed it all up though, so here is one of it on one of my local store's gaming tables.

Apart from minimising risk, I also wanted to make space for my next project: Cryx.

I started painting then yesterday, well, the starter set, any way. I'm doing an alternate paint scheme to the traditional get one. I'm going for a rusty, weathered, swampy look, inspired by a scheme in the mini issue of No Quarter that came with the models. It goes on really quickly as I'm using a lot if washes and only two basic colours.

Right now I'm really wishing I had built the bases first though. I found some really inspiring looking swamp bases this morning. I figure I could do something almost as goods looking, but I'll be a little hampered now that I have glide the figures in place.

Whatever happens with the bases though, I'm happy about how the models are turning out. I will publish some pictures and a step by step of sorts later in the week.


Tuesday, June 5, 2012

Urban Base Part 4: Nearly Done

So, having, washed and drybrushed everything, then painted up the gold bits, it was time to add some weathering powders.

Now, you can get a lot of the effects I have gone for using normal brushes and paints. But I really like using powders as they seems to give a richness to the effect very quickly. Because these things don't dry as such, it is easy to blend tones together, get streaks, and piles of the stuff in cracks and crevices.

As someone who has actually started a fair few fires, I can certify it looks fairly authentic
 
 I do have a couple of tips for anyone else planning to use powders though, mostly related to the fact these are very light, very strongly pigmented powders that will stain anything on contact and are designed to spread.

So, firstly, take care opening them. I use the Forge World powders and the lids can take a little 'persuading' to get off. So it can be tempting to just jam your thumb in there - DON'T. You run the risk of spilling them all over your self/home/pets if you take the cap off carelessly. On a similar note, make sure you are apply them to your model or whatever while it is on something disposable, like the large piece of cardboard in my pictures, not your regular painting area. Again, these are very easily spread, highly pigmented products and will stain anything they touch - take care clearing up any spills (I tend to mop up any dropped particles very quickly with a damp piece of kitchen roll). Finally, use a spray varnish to fix the powders to your model when you have the look you want. I use Army Painter's Matt Varnish for most things. Forge World sometimes use Citadel's Purity Seal (usually when they want to fix a detail in place but then paint over it with something else) and I'm sure there are many many others out there. I have even used an enamel matte varnish in an airbrush but I stick with the spraycan for convenience nowadays.

I also recommend getting a special brush for using powders. Not special like, it costs lots of money and you keep it in  velvet box. Just special, like you only use it for weathering powders. I got a nice stiff-bristled, fairly wide, artificial fibres one from the bargain bucket at my local art store and have been using it for a couple of years now. The stiff fibres help my pick up powder from its bottles and are  great for crushing it down or dragging it out on models. I don't even bother washing it really - pretty much all the powders come off the artificial bristles so I treat it something like a good wok - let a nice patina slowly build up that will add a characteristic 'flavour' to your work.

So, just by sprinkling, squashing, and dragging two powders - Grey Ash and Black Soot - I have a base that really is starting to look like its been in a fire. All part of the urban ruin look I am going for.

I started painting the rim of the piece with Graveyard Earth too. When I did, I started to find the places where my earlier layers of PVA sealant had gotten broken and cracked - there are quite a few pits and divots in what was a nice smooth surface before I started spraying. I guess the lesson I learn here is to take extra care handling stuff like this and USE MORE PVA!

Monday, June 4, 2012

Building an Urban Display Base Part 3

Pretty much all the easy stuff is now done. I have built the base, basecoated it, washed some parts, and drybrushed everything.

I am going for a dirty grey colour, a scheme that was once labeled 'urban' or 'hive world' or something like that by GW - until they decided to remove all pages that mentioned their 'old' colour range. First I went with a very dark grey - a mix of Chaos Black and a little Codex Grey. I then washed the ground with black wash. Everything has then been drybrushed with Codex Grey, then Fortress Grey, then, for the stone parts only, an extreme highlight of Skull White. Its a challenge to make the different textures stand out from each other while using the same colours. But that's one of the nice things about drybrushing - by varying the intensity or even just the direction with which you do it, you can create different effects that look quite convincing, quite quickly.


At the moment then, the base looks nice, but monochromatic. The next step is to bring out some of the details, particularly the gold on the collapsed balustrades and fallen Imperial icon, and get a bit of colour in there.

Its also important to remember that a lot of the base will end up covered by the figures I am going to display on it though, but hopefully there will still be enough of it visible to add character and a sense of belonging to my miniatures.

Wednesday, May 30, 2012

Building an Urban Display Base

There was a time when I thought I wanted a Grey Knights army. I kind of liked the idea of an Inquisitor-led group, rolling up heretics and xenos, then going home to toast the Emperor. Or whatever an Inquisitor army would do after a good fight. I went as far as getting a Gideon Lorr model from ebay (a £10 bargain!) and a couple of assassins, but never got round to painting them. The only models for the army I have gotten round to painting are these Terminators.

(Picture forthcoming)

Most of the time they just sit on a shelf, all lonely because noone wants to play with them. And most of the time I can't be bothered with entering my local GW's painting competition. But this month the theme is 'an infantry unit' and there may be some other good competitors so, time for these boys to see fresh air!

I am fairly happy with the paint on these models overall, but I particularly like the urban-style bases I did. I'm really proud of the salt-technique painting I did on the sergeant's base to give the impression of a shattered piece of roadway. Frankly, bases are normally my weakest area when it comes to models. Maybe I get bored easily, maybe I lack imagination, maybe I just don't see that many inspiring bases at all (not that they're not out there, just that they're not around here). But usually my basing doesn't go very far beyond sticking a bit of flock or some slate down.

I made an effort with these guys though and I figure I really don't want to lost the competition because even though my soldiers are the best painted, they lose because some other yahoo comes along with his massively over-worked base and wins because everyone goes 'oh, that's so cool', and votes for it even though most of the entry isn't even a GW product....

Didn't there used to be a rule about percentages of a submission being GW stuff?
 Well, not this time, buddy!

So, here's the start of my new project: Urban Display Base.

I'm starting out with a small piece of polystyrene foam, an offcut from another project. I have coated it with a layer of water-thinned PVA glue. This should help seal the base and make spray-paint-related melting incidents less likely further down the line. I've also started building a small collection of urban-themed scenery pieces to add on and will start sticking them on tomorrow.


Stay tuned for more urban goodness!